
Learn how to make my tried-and-true zucchini lasagna! This easy, gluten-free recipe has the flavors of a classic lasagne in every bite, but with thinly-sliced zucchini instead of pasta noodles. I’ve perfected this recipe so that the results are never watery, just perfectly tender zucchini layered with creamy ricotta, melty cheese and rich marinara.

It’s no secret that I am a big fan of anything related to pasta, luscious red sauce, and melted cheese. I’m obsessed with Italian food, but I try to keep it balanced because Italian cuisine tends to be higher in carbs. And that’s where this healthy, zucchini lasagna comes in!
This low-carb lasagna has become a favorite in our home. The key to success is removing excess moisture from the zucchini before layering. I’ll show you exactly how to do that below.
Whether you are looking for a healthier weeknight dinner, or trying using up your summer zucchini harvest, I am so sure you and your family will love this recipe.
One reader, Thomas, says: “Absolutely the best lasagna I have ever made—I would give it 10 stars if I could.” ★★★★★
Ingredients You Need
To make this recipe, you’ll need just a handful of Italian cheeses, fresh produce, and fresh herbs. Here’s the full list: Zucchini (yellow or green), Parmigiano Reggiano (fresh parmesan), mozzarella (low moisture), ricotta, garlic cloves, egg, fresh basil, fresh oregano, and marinara sauce.

How to Make Zucchini Lasagna
Making zucchini lasagna is easier than you think! Here’s the simple process:
- Slice the zucchini into thin noodles using a mandoline or sharp knife (1/8-inch thick)
- Remove excess moisture by salting the zucchini slices, letting them sit for 10 minutes, then pre-baking at 375°F for 10 minutes
- Make the ricotta filling by mixing ricotta, parmesan, garlic, egg, and fresh herbs
- Layer the lasagna starting with marinara sauce, then zucchini noodles, ricotta mixture, fresh herbs, and mozzarella cheese (repeat layers)
- Bake uncovered at 375°F for 40-45 minutes, then broil on HIGH for 1 minute until the cheese is golden brown
Now let’s walk through each step in detail:
How to Cut Zucchini Noodles
-
1
Use a mandoline slicer. The most important step in mastering zucchini lasagna is getting precise cuts for the noodles. I like to use a mandoline slicer for this, set the tool to 1/8 inch cuts and always use the guard for protection!
-
2
Or use a chef’s knife. Another way you can cut the zucchini into noodles is slicing the ends off, standing the zucchini upright, and using a chefs knife to eyeball 1/8 inch cuts. I would only recommend this step if you are experienced with a chef’s knife. Be very careful and patient with the cuts if you do this.

How to Make Zucchini Noodles Less Watery
-
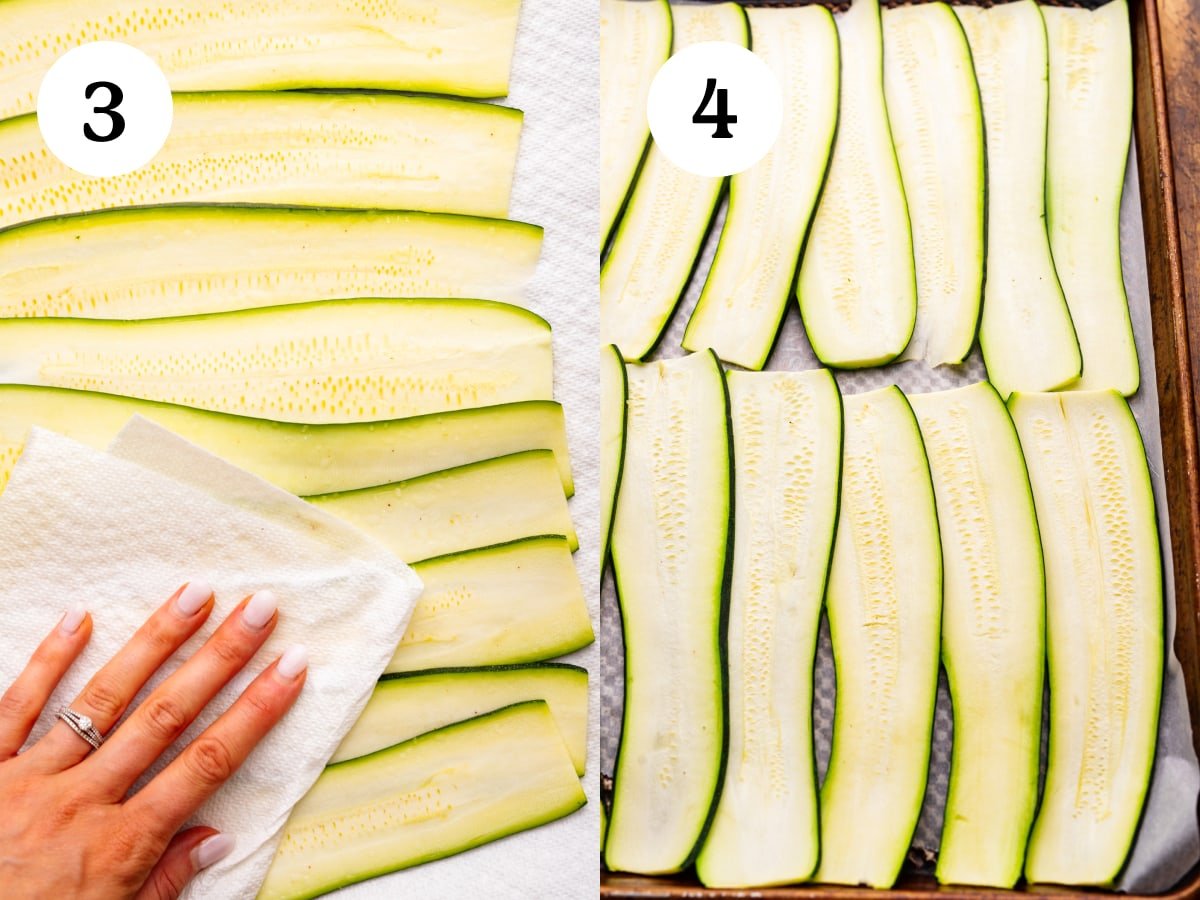
3
Salt the zucchini. In order to remove excess moisture, you have to salt the zucchini. Arrange the noodles on paper towels and lightly salt them, then let them sit for 10 minutes. Pat them dry when finished and wipe off the salt.
-
4
Pre-bake the zucchini noodles. The next step to ensure the noodles are soft and not watery, is to bake them. Place the noodles on trays lined with parchment paper and bake for 10 minutes at 375F. Then pat dry when they’re removed from the oven.
Assemble and Bake the Lasagna
-
5
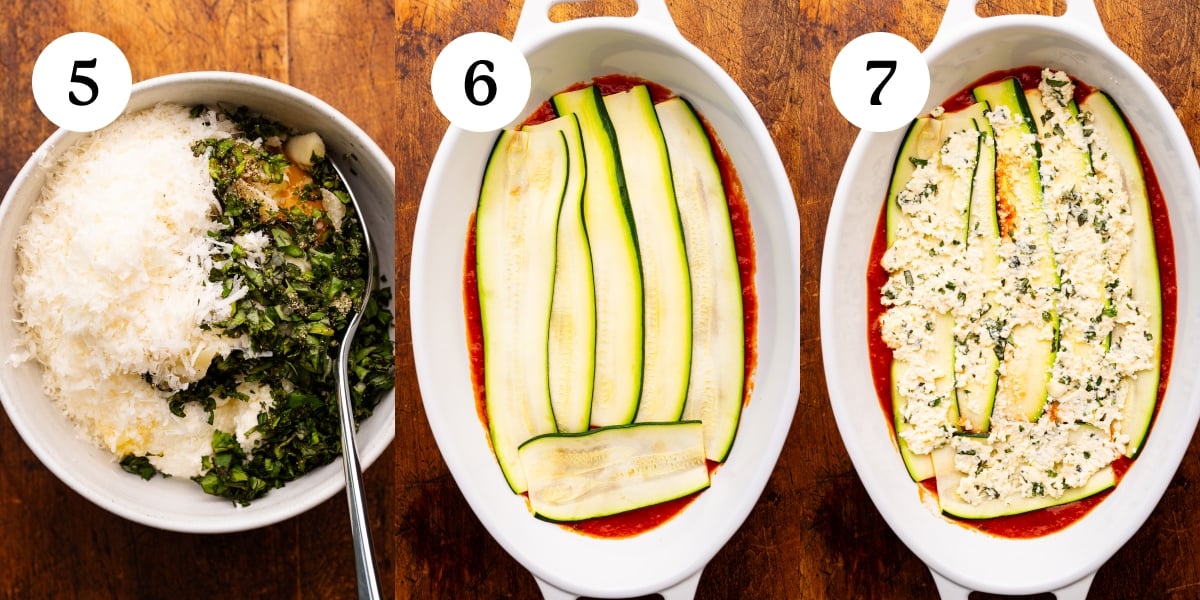
Mix the ricotta filling. In a small to medium-sized bowl, mix together the ricotta, parmesan cheese, garlic, fresh basil, egg, and pinch of salt & black pepper.
-
6
Layer the lasagna. Next, in a 13×9 baking dish, spread a thin layer of marinara, and a layer of zucchini noodles.
-
7
Add the ricotta and herbs. Next, spread a thin layer of ricotta and sprinkle the chopped basil and oregano over top.
-
8
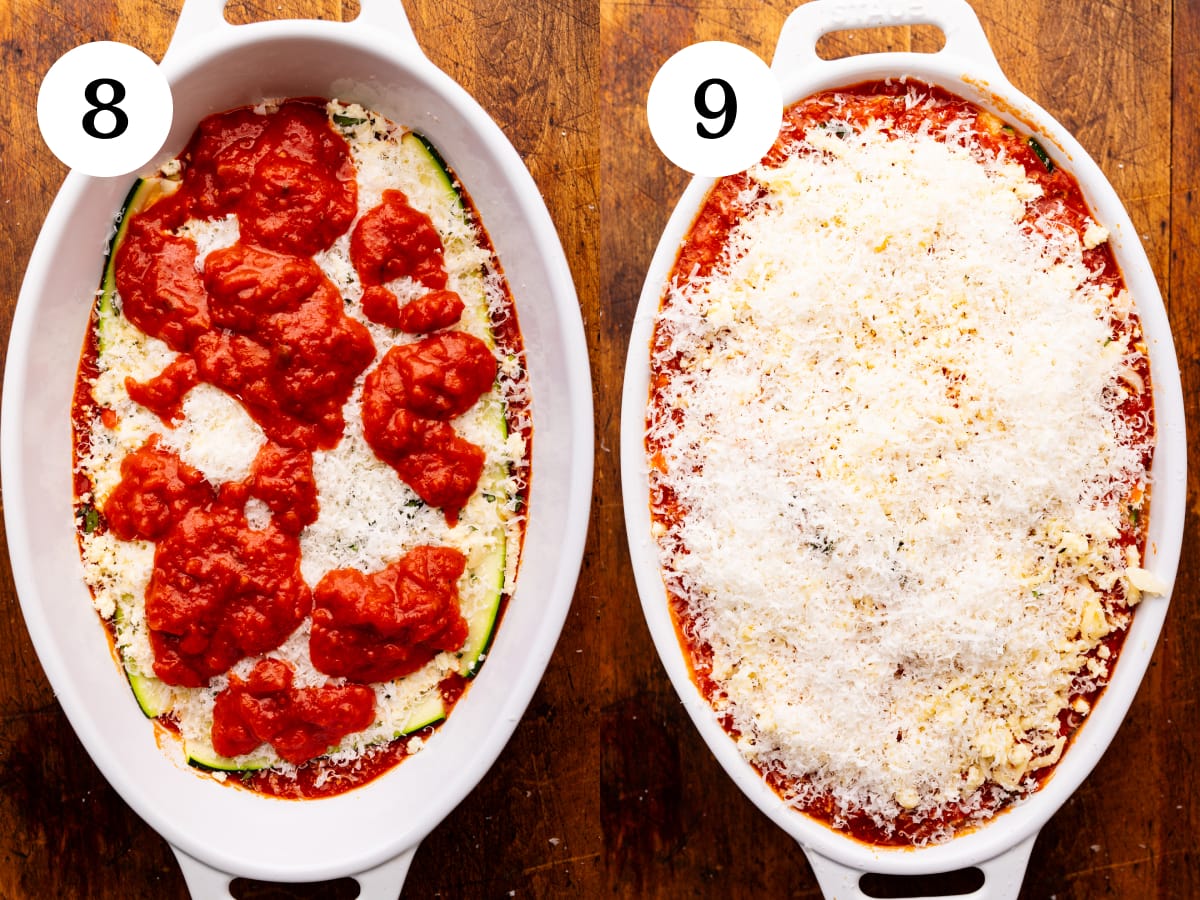
Top with cheese and repeat. Next, add a layer of mozzarella and a little parmesan cheese. Then repeat until finished with sauce, zucchini noodles, ricotta, herbs, and cheese.
-
9
Final layer and bake. Top the last layer of the lasagna with mozzarella and parmesan. Bake uncovered at 375F for 40-45 minutes, broil on HIGH for 1 minute for the cheese to brown. Then slice and serve!
One reader, Tara, made this for her family: “Even my skeptic totally meat-eating husband had two helpings!” ★★★★★

How to Reheat
If refrigerated or frozen, the lasagna can be easily reheated.
Preheat oven to 350F for refrigerated lasagna and reheat for around 15 minutes until warm.
For unbaked frozen lasagna, let thaw and bake at 350F for 30 to 40 minutes until the cheese is browned and bubbling.
Tips For Success

Mandoline Slicer
Slice Vegetables Like a Pro
I love using this mandoline slicer to get consistent cuts of zucchini for this recipe – it makes my life so much easier! It's a safe and efficient way to slice all types of vegetables. A must-have for your kitchen.
If you click this link and make a purchase, we may earn a commission at no additional cost to you.- Zucchini needs to be thinly sliced. Using either a mandoline slicer or precise cuts using a chef’s knife, the zucchini must be cut thin (no more than 1/4 of an inch and no less than 1/8 of an inch). This will ensure the zucchini can cook properly and the dish will be a success!
- Thin layers are key. Over the years of making this recipe, I found my biggest mistake was layering the sauce and ricotta too much per layer. Keep it thin; use less than you need and it will all add up and come together when baked. This will also help the lasagna have structured slices and not become a mess in the baking dish.
- Use our favorite marinara (homemade or store-bought). You can use my family’s San Marzano Tomato Sauce or my family’s favorite store-bought marinara!
- Fresh basil is a must. I think fresh herbs make all the difference! I love layering lasagna with chopped fresh basil and even fresh oregano. Remember, dried herbs do not give as much flavor as fresh herbs.
- If the ricotta is too watery, strain it. Every brand of ricotta is different, but some have extra liquid that can contribute to a watery zucchini lasagna. To prevent this, use a fine mesh strainer to drain the extra liquid before using it in the dish.
Serving Suggestions
Pasta. One of our favorite things to serve with this lasagna is pasta! Whether using gluten-free pasta made with chickpeas or our favorite whole-grain pasta. If you want to keep it low-carb, you can skip the pasta!
Protein. If you want to add a serving of protein alongside this lasagna, pair it with our 15-minute lemon chicken piccata, our secret ingredient Italian meatballs, or chicken parmesan!
Salad. Whenever we make this dish, we always serve it alongside an Italian or Mediterranean-style salad, such as our Tuscan artichoke salad, Panzanella salad, or our go-to Greek chickpea salad!
Bread. Lastly, crusty Italian bread is a lasagna’s best friend! You can do an Italian loaf, healthy grain bread, or sourdough.

Love Zucchini? Try these Recipes!
When summer comes, I am always making zucchini dishes! If you love this lasagna, you might also love our zucchini rollatini, baked parmesan zucchini fries, zucchini meatballs, or this eggplant & zucchini lasagna!

Zucchini Lasagna
Video Tutorial

Ingredients
- 4-5 large zucchinis, sliced thin (1/8-inch cuts)
- 3/4 cup freshly grated Parmigiano Reggiano/Parmesan cheese
- 1 lb mozzarella, shredded
- 2 1/2 cups tomato sauce
Ricotta filling
- 1 cup ricotta cheese (drained of liquids)
- 1/3 cup freshly grated Parmigiano Reggiano/Parmesan cheese
- 3 garlic cloves, minced
- 1 egg
- pinch of salt
- 1/4 teaspoon black pepper
- 1/4 cup fresh basil, chopped
Instructions
- Preheat oven to 375F.
- Salt & pre-bake zucchini noodles: arrange zucchini slices on a sheet pan lined with parchment paper. Sprinkle lightly with salt – let sit for 5-10 minutes so zucchini "sweats" any excess moisture. Use paper towels to press and dry zucchini noodles, and wipe off any extra salt. Then bake noodles for 8-10 minutes – pat them dry after baking. Note: pre-baking the zucchini will help dry up even more moisture from the noodles.
- Ricotta filling: in a medium-sized bowl, mix all of ricotta filling ingredients together.
- Layer ingredients: In a 13×9 baking dish, layer lasagna: spread a thin layer of sauce on the bottom of the dish, add layer of cooked zucchini noodles, thin layer of ricotta filling, and mozzarella cheese & little parmesan Repeat each step until finished. On top layer with sauce, mozzarella cheese, and parmesan cheese.
- Bake: Leave dish uncovered and bake for 40-45 minutes, then broil on HIGH for 1 to 2 minutes until cheese is browned. Sprinkle with chopped fresh basil. Slice and enjoy!


My wife’s garden surprised us with a 2 1/2 pound zucchini hiding in the raised bed yesterday, We made a loaf of zucchini bread and this recipe with it. Her first comment on eating the lasagna was “I really like it!” She’s taking some leftovers for lunch tomorrow. Thank you, Bethany, for sharing this recipe.
Recipe was good, what led me to this was getting rid of the water. But it was still very watery!
looks good – will tr it
This time i added tomato paste, mushrooms, onions, and sausage. I thought I would be adding a little extra cheese all the way around but I think I pretty much stuck close to the measurements in the recipe and I’m happy I did. I had no leftover sauce and really no leftover cheese so it was perfect. I did use the mandolin slicer for the zucchinis which made it pretty easy. I added the tomato paste after sauteing the onions and sausage. I added a tablespoon of tomato paste and let that cook in the onions and sausage before adding that to the marinara and mushrooms. I’m really happy with how it turned out.
I love this recipe. I’ve made it a bunch of times now. I do add sausage,mushrooms, and onions, plus more ricotta, extra parm and mozzarella as well. It turns out amazing!
It turned out amazing! I’ve made it twice, the first time I added sausage and lean ground beef. The second time I just added sausage and both times it turned out absolutely amazing. The first time I ended up having too much sauce because I added too much meat but this time I only had a little bit leftover sauce and like I said, amazing! Next time I might not add any meat and see how that goes I bet it will still be amazing. Thank you for the recipe.
Nice flavour but very watery even though followed directions to avoid this
Just what I was looking for though I do not have a mandoline, so I used an old-school cheese slicer (like what you might use for a chacuterie board). The slices were uniform though you have to go slow and maintain even pressure to keep it just right. This was so mch lighter than pasta that if was a welcome change. I’ve never enjoyed heavy carbs so I was excited to try an alternative! On a side note, I think you could add a layer of sliced mushrooms (crimini or baby bella) to give it more substance if you think it’s too light. It was still a bit watery but I will say I didn’t mind it as I like saucy things. I used whole milk ricotta, which doesn’t have standing liquid to drain and I’m thinking this may have made it creamier but no less moist. LOL! I also threw in a whole extra clove of garlic just because I like it. Enjoy!
This is one great recipe. My partner will not eat most vegetables (especially green ones), so I made this for my cousin (who is my guinea pig), with an eye toward making it for a vegetarian couple, one of whom is gluten free. She loved it. I loved it. It is rather labor intensive but so worth it. Beyond all expectations. I may have added more parm than the recipe calls for as I was just sprinkling it on at the end. BTW, I’m not certain the width of the “noodles” matters all that much, as long as you bake them long enough to dry them out. And, a little crunch never hurt anyone.
I followed recipe 100 percent…disappointed on how it came out though. Watery to the maximum! Generally l fry the zucchini noodles. I will continue to in the future… sad
Easy to follow recipe, delicious!
This was delicious. However, a back of the envelope calculation of the nutrition information showed your findings wildly inaccurate as to calories, fat (in a huge way) and protein. ( I didn’t calculate carbs.) To say it was off by a bit is a complete understatement. If you are going to note nutrition facts make sure they are somewhat accurate. Now I can’t trust any of your nutrition “facts”
Hi Rebecca, the nutritional facts I wish could be more accurate. The platform I use is one a lot of food bloggers use. The nutritional info are an estimate on every recipe website as it is very difficult to be accurate as we all use different brands/ingredients.